Day 1
We will cover:
- Introduction to the course.
- Basic Unix.
- Introduction to HAWK.
- Basic Unix Continued.
- Fetching the scrnaseq nextflow pipeline.
- Setting up the pipeline for execution.
- Running the pipeline.
What you will learn on this course:
- Basic Unix commands
- Working on HPC
- Downloading scrnaseq datasets and genome files.
- Setting up directory for the data processing and analysis.
- How to run Nextflow pipeline on HPCs.
- How to process 10x cellranger pipeline.
- How to process and analyse scrnaseq count data in R.
- How to visualise the analysed data and perform additional downstream analysis.
Introduction to Single-Cell RNA-seq
- RNA-seq allows profiling the transcripts in a sample in an efficient and cost-effective way.
- Part of its success is due to the fact that RNA-seq allows for an unbiased sampling of all transcripts in a sample, rather than being limited to a pre-determined set of transcripts (as in microarrays or RT-qPCR).
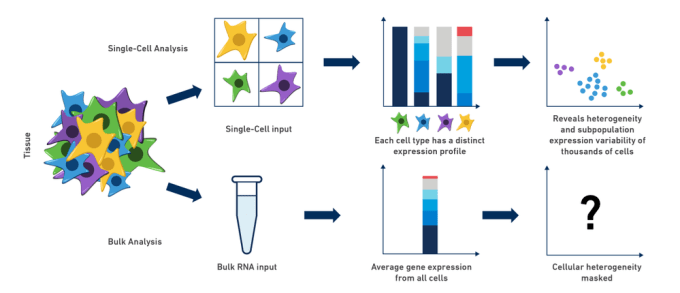
- Typically, RNA-seq has been used in samples composed of a mixture of cells, referred to as bulk RNA-seq, and has many applications.
- For example, it can be used to characterise expression signatures between tissues in healthy/diseased, wild-type/mutant or control/treated samples.
- However, with bulk RNA-seq we can only estimate the average expression level for each gene across a population of cells, without regard for the heterogeneity in gene expression across individual cells of that sample.
-
Unlike with the bulk approach, with scRNA-seq we can estimate a distribution of expression levels for each gene across a population of cells.
-
This allows us to answer new biological questions where cell-specific changes in the transcriptome are important. For example discovering new or rare cell types, identifying differential cell composition between healthy/diseased tissues or understanding cell differentiation during development.
Sample Preparation Protocols
Broadly speaking, a typical scRNA-seq protocol consists of the following steps (illustrated in the figure below):
-
Tissue dissection and cell dissociating to obtain a suspension of cells.
-
Optionally cells may be selected
-
Capture single cells into individual reaction containers (e.g. wells or oil droplets).
-
Extracting the RNA from each cell.
-
Reverse-transcribing the RNA to more stable cDNA.
-
Amplifying the cDNA (either by in vitro transcription or by PCR).
-
Preparing the sequencing library with adequate molecular adapters.
-
Sequencing, usually with paired-end Illumina protocols.
-
Processing the raw data to obtain a count matrix of genes-by-cells
-
Carrying several downstream analysis (the focus of this course).
Unix: Configuration
Unix: Hardware
- Hardware: the physical components (the bits you can see when you take the back off a computer.
- CPU (central processing unit): the computer chip performing the calculations.
- Hard drive: saved storage – your saved files.
- RAM (random access memory): like the hard drive, it stores information. Access (reading this information) is faster than the hard drive, although information is only present whilst the compute is powered on, i.e. this is memory space.
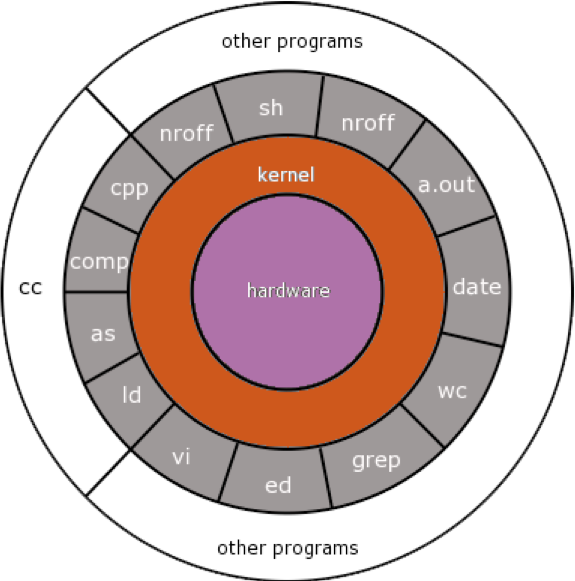
Unix: Kernel
-
The kernel sits between the command line and the hardware.
-
When you type a command line to the screen and hit “enter,” the kernel executes the command, allocating the appropriate time and memory to the task.
Unix: Commands
-
the commands are the bread-and-butter functions common to all Linux installations and are part of the core (minimal) install.
-
they perform core processes such as file and job manipulations (read, write, delete files/jobs).
Unix: Programs
-
Other programs work identically to the core commands.
-
They are different because they generally perform specialised functions, for example, mapping next-generation sequence to a genome assembly.
Basic Unix: Graphical User Interface (GUI) & Command Line/Shell
- All Windows/Mac/Linux PC’s use a GUI to allow users to easily navigate and use the PC.
- The GUI is common to Window/Mac/Linux.
- The interface permits you to access files and run commands/programs by clicking icon/apps, drag-and-drop.
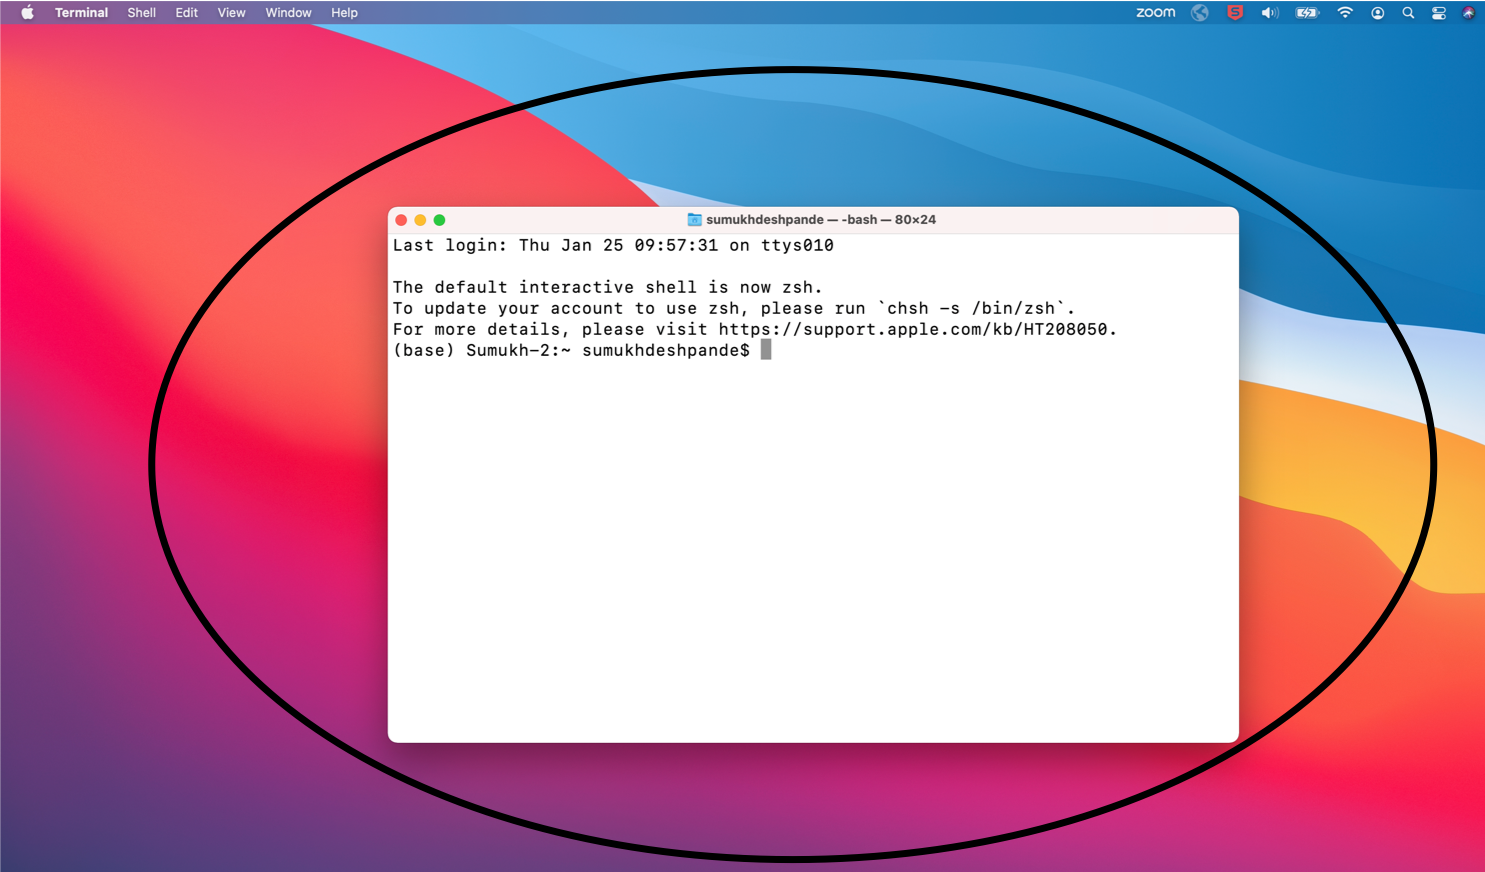
This is a shell. We can use this to type commands etc.
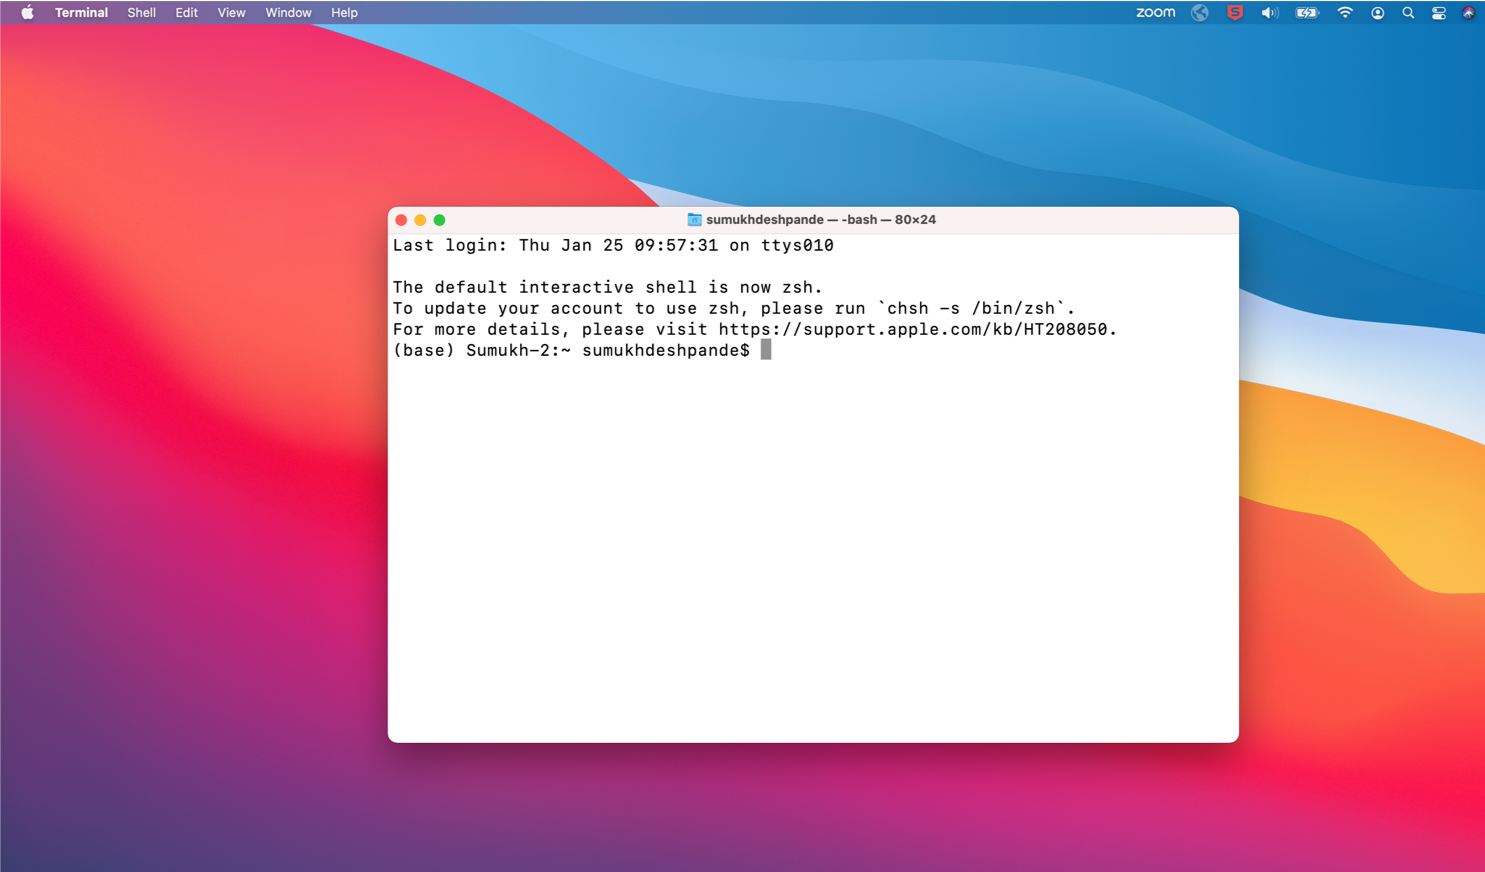
In simple terms, the window on the computer into which you type a command, is called the shell
Setup and Installation
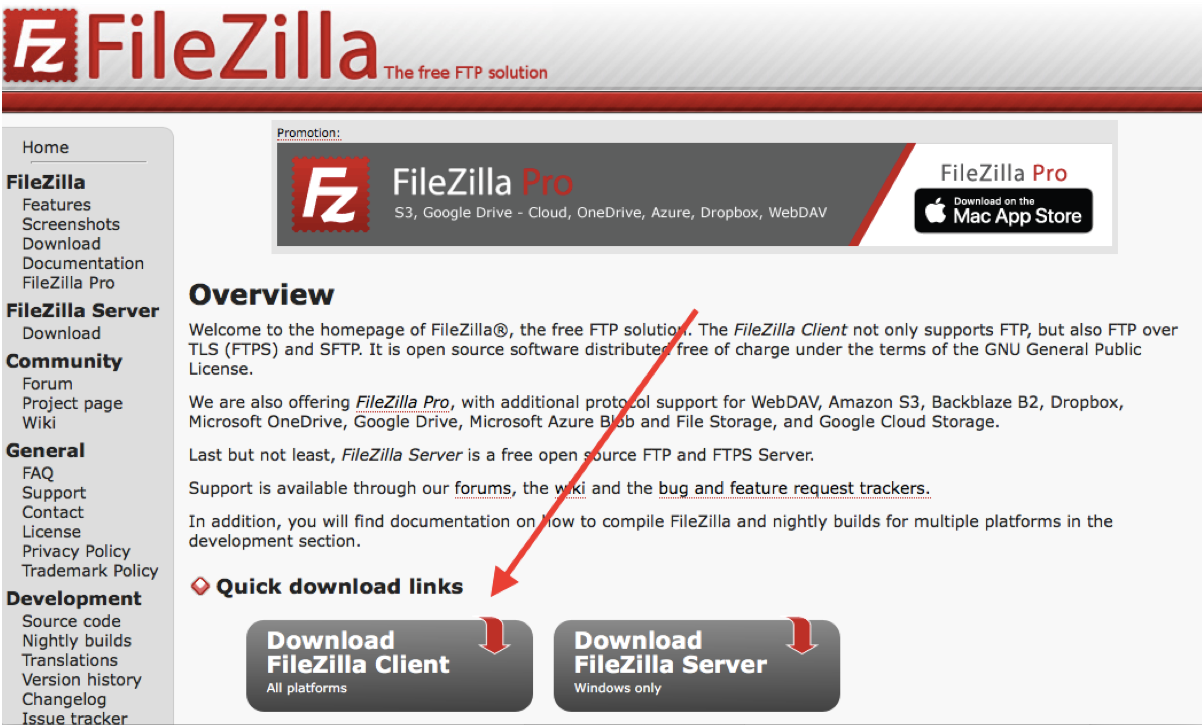
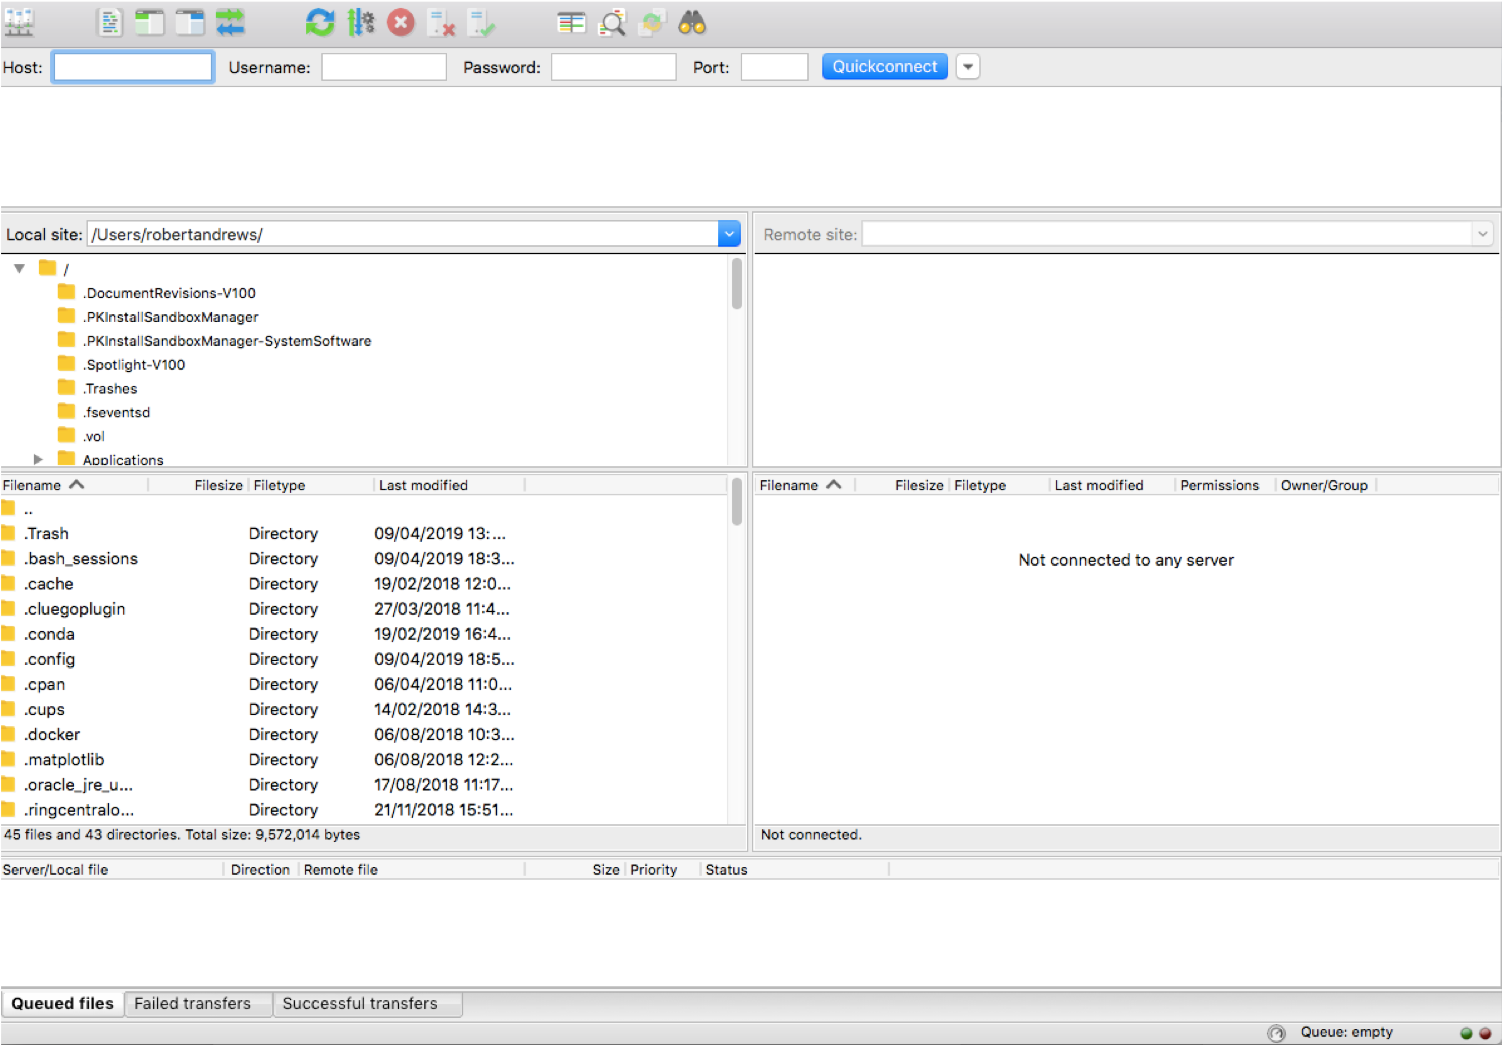
FILEZILLA
Download Filezilla client for Mac/Windows
1.
2.

3.
Introduction to HAWK
- HAWK is Cardiff and Bangor universities High Performance Compute (HPC) system.
- Swansea and Aberystwyth universities use SunBird - both systems are run by Supercomputing Wales (SCW).
- Both HPC’s are the same, but set-up slightly different - we will be working with HAWK.
- If we need to run analyses/softwares/code that requires a lot of computing power, we need to use HPC’s.
- The way we interact with HAWK is through the command line via Bash.
- Think of HAWK as a computer that’s located in the cloud. We can connect to it via out Unix shells - Terminal, MobaXterm, and FileZilla.
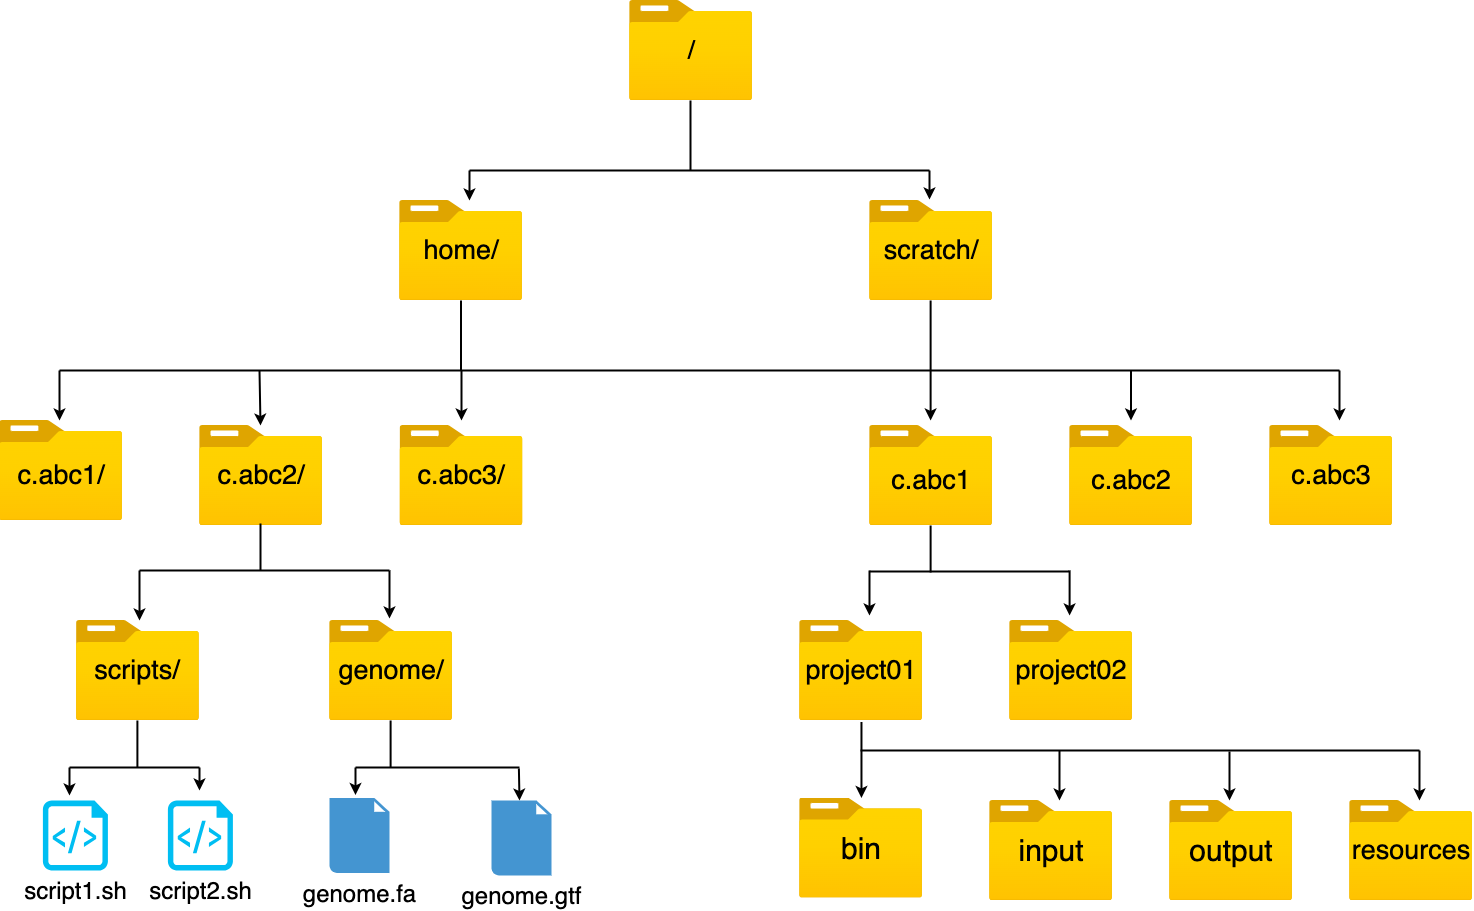
HAWK Folder Structure
Basic Unix Commands
- Here is a list of commonly used Unix commands that we will be using:
| Command | Description | Common Options | Option Description |
|---|---|---|---|
ls |
print directory contents | ls -lah |
list that is long, shows hidden files, and is human-readable |
mv |
rename/move a file | mv -r/* |
moves recursively (moves a directory and everything inside)/moves everything |
cp |
copy a file | cp -r/* |
copies recursively (copies a directory and everything inside)/copies everything |
cd |
change directory | ||
pwd |
print current working directory | ||
history |
what have I typed? | ||
rm |
remove a file | rm -r/* |
removes recursively (removes a directory and everything inside)/removes everything |
mkdir |
make a directory | ||
touch |
make an empty file | ||
nano |
open and edit a file | ||
more/less |
reads a file | ||
head |
read the top of a file | ||
tail |
read the bottom of a file | ||
wc |
count the number of lines in a file | ||
grep |
word search in a file | ||
chmod |
change permission of a file | chmod +x |
makes file executable |
Basic Unix Commands: pwd Command
- When we first open a Unix shell, we are taken to the default directory.
- If you have downloaded a shell (such as iTerm2, MobaXterm), this location can change depending on where you installed the software.
- To find out where we are currently located, we can use the
pwdcommand. - In the example below, the pwd output tells me that I am in my Desktop directory.
Input
pwd
Output
/Users/sumukhdeshpande/Desktop
Basic Unix Commands: ls Command
- To explore the directory, we can use the
lscommand to list the contents of the Desktop directory:
Input
ls
Output
[c.mcbsd1@cl2(hawk) ~]$ ls
assessments     bin        Box-data  c.mcbsd1_dirs.txt            Downloads       featureCounts
ls -lshows the contents in the long format.- It provides more information than a simple ls command, including file permissions, ownership, size, and modification time.
Input
ls -l
Output
[c.mcbsd1@cl2(hawk) ~]$ ls -l
total 11840
drwxrwxr-x 11 c.mcbsd1 c.mcbsd1    4096 Nov 12  2021 assessments
drwxrwxr-x  2 c.mcbsd1 c.mcbsd1    4096 Oct  8 11:15 bin
drwxrwxr-x  2 c.mcbsd1 c.mcbsd1    4096 Nov 26  2018 Box-data
-rw-r--r--  1 c.mcbsd1 c.mcbsd1 1061373 Oct 11  2022 c.mcbsd1_dirs.txt
drwxrwxr-x  9 c.mcbsd1 c.mcbsd1    4096 Oct  4 11:22 Downloads
-rwx------  1 c.mcbsd1 c.mcbsd1 1691978 Sep 25  2019 featureCounts
ls -lhshows the contents in the human-readable long format.
Input
ls -lh
Output
[c.mcbsd1@cl2(hawk) ~]$ ls -lh
total 12M
drwxrwxr-x 11 c.mcbsd1 c.mcbsd1 4.0K Nov 12  2021 assessments
drwxrwxr-x  2 c.mcbsd1 c.mcbsd1 4.0K Oct  8 11:15 bin
drwxrwxr-x  2 c.mcbsd1 c.mcbsd1 4.0K Nov 26  2018 Box-data
-rw-r--r--  1 c.mcbsd1 c.mcbsd1 1.1M Oct 11  2022 c.mcbsd1_dirs.txt
drwxrwxr-x  9 c.mcbsd1 c.mcbsd1 4.0K Oct  4 11:22 Downloads
-rwx------  1 c.mcbsd1 c.mcbsd1 1.7M Sep 25  2019 featureCounts
Basic Unix Commands: cd Command
- To move between different directories, we use the
cdcommand. - In the example below, we move into the Box-data directory.
- Note: we can use the
tab-keyto autofill. Start typing the name of the directory and then hit tab. - Note: when we use the
cdcommand, we don’t get any feedback from the shell. Usually, we move into the directory, then use thelscommand to show us the contents.
Input
cd Box-data
ls
Output
[c.mcbsd1@cl2(hawk) Box-data]$ ls
download_files_script1.py  download_files_script2.py  download_files_script.py
Making Use Of The Dot(.)
- As mentioned above, the dot(.) is used to tell the system where you currently are.
- This is best used for commands such as
lsandcd. - When we combine two dots(..), this tells the system to use the directory above where we currently are.
| Input | Description |
|---|---|
| . | Here/where I am now |
| .. | Previous directory/up one directory |
-For example, if I am currently in the Desktop directory and want to list contents of where I currently am, I can either use ls or ls .
Input
ls -l
ls -l ..
Output
[c.mcbsd1@cl2(hawk) Box-data]$ ls -l
total 12
-rw-rw-r-- 1 c.mcbsd1 c.mcbsd1 867 Nov 26  2018 download_files_script1.py
-rw-rw-r-- 1 c.mcbsd1 c.mcbsd1 869 Nov 26  2018 download_files_script2.py
-rw-rw-r-- 1 c.mcbsd1 c.mcbsd1 183 Nov 26  2018 download_files_script.py
[c.mcbsd1@cl2(hawk) Box-data]$ ls -l ..
drwxrwxr-x 11 c.mcbsd1 c.mcbsd1    4096 Nov 12  2021 assessments
drwxrwxr-x  2 c.mcbsd1 c.mcbsd1    4096 Oct  8 11:15 bin
drwxrwxr-x  2 c.mcbsd1 c.mcbsd1    4096 Nov 26  2018 Box-data
-rw-r--r--  1 c.mcbsd1 c.mcbsd1 1061373 Oct 11  2022 c.mcbsd1_dirs.txt
drwxrwxr-x  9 c.mcbsd1 c.mcbsd1    4096 Oct  4 11:22 Downloads
-rwx------  1 c.mcbsd1 c.mcbsd1 1691978 Sep 25  2019 featureCounts
Basic Unix Commands: Making a directory
- To make a directory, we can use the
mkdircommand.
Input
mkdir name-of-directory
- The command works by calling the
mkdircommand followed by the name of the directory you want to make. - We can use this command to make multiple directories within the current directory, too:
Input
mkdir directory1 directory2 directory3
- Each new directory is named after the other and is separated by a space whilst using the command.
- We can also create a new directory within an existing directory without moving into it:
Input
mkdir directory1/directory1.1
Basic Unix Commands: touch command
- This is primarily used to create empty files.
Input
touch new_file.txt
- You can create multiple empty files in a single command.
Input
touch new_file1.txt new_file2.txt new_file3.txt
Basic Unix Commands: mv command
- The
mvcommand in unix is used to move or rename files and directories.
Input
mv file.txt /path/to/destination
For example,
Input
mv new_file1.txt /home/c.mcbsd1/Documents
Wildcard (*)
- The wildcard (*) can be used to select multiple things at once.
- It is used to match any character and is commonly used to select directories/files with common names.
- Example: if there are multiple directories (file-1 through file-10) and I wanted to move them all into one directory (dir-1), I could use the common name to all the files followed by the wildcard.
mv file* dir-1/
- The wildcard can also be used to select the same file extensions. Example: If we wanted to move all the .fastq files to a new directory, we would use the wildcard followed by the extension.
mv *.fastq dir-1/
Basic Unix Commands: Copying a file using cp command
- The copy command does what it says on the tin… Copies a file/directory from one place to another.
Input
cp new_file2.txt /home/c.mcbsd1/Documents
- The command works by first inputting the name of the file/directory that you want to copy, followed by the location of where you want to copy it to.
- To copy a directory, we need to use the
-roption, which recursively copies the directory and all of its contents to the desired location:
Input
cp -r name-of-directory path/to/directory/
Basic Unix Commands: Removing files and folders using rm command
-
This is used to remove files or directories. It is a powerful command, so it should be used cautiously, as deleted files and directories are typically not recoverable.
-
For example, we will create an example text file called “test_file.txt”
Input
touch test_file.txt
ls -l
rm test_file.txt
Exercise 1
- Open a shell on your PC.
- Find out where you are.
- Create a directory named
practical-1in your current working directory. - Create three text files within
practical-1folder. For ex- prac_file1.txt, prac_file2.txt, prac_file3.txt - Move into the
practical-1directory and list the contents. - Remove the prac_file3.txt from the
practical-1folder.
Nextflow pipeline
Log into HAWK
- Lets first log onto HAWK. We will be using a terminal to access HAWK.
- If you are a Mac user, you can use terminal to access the remote server.
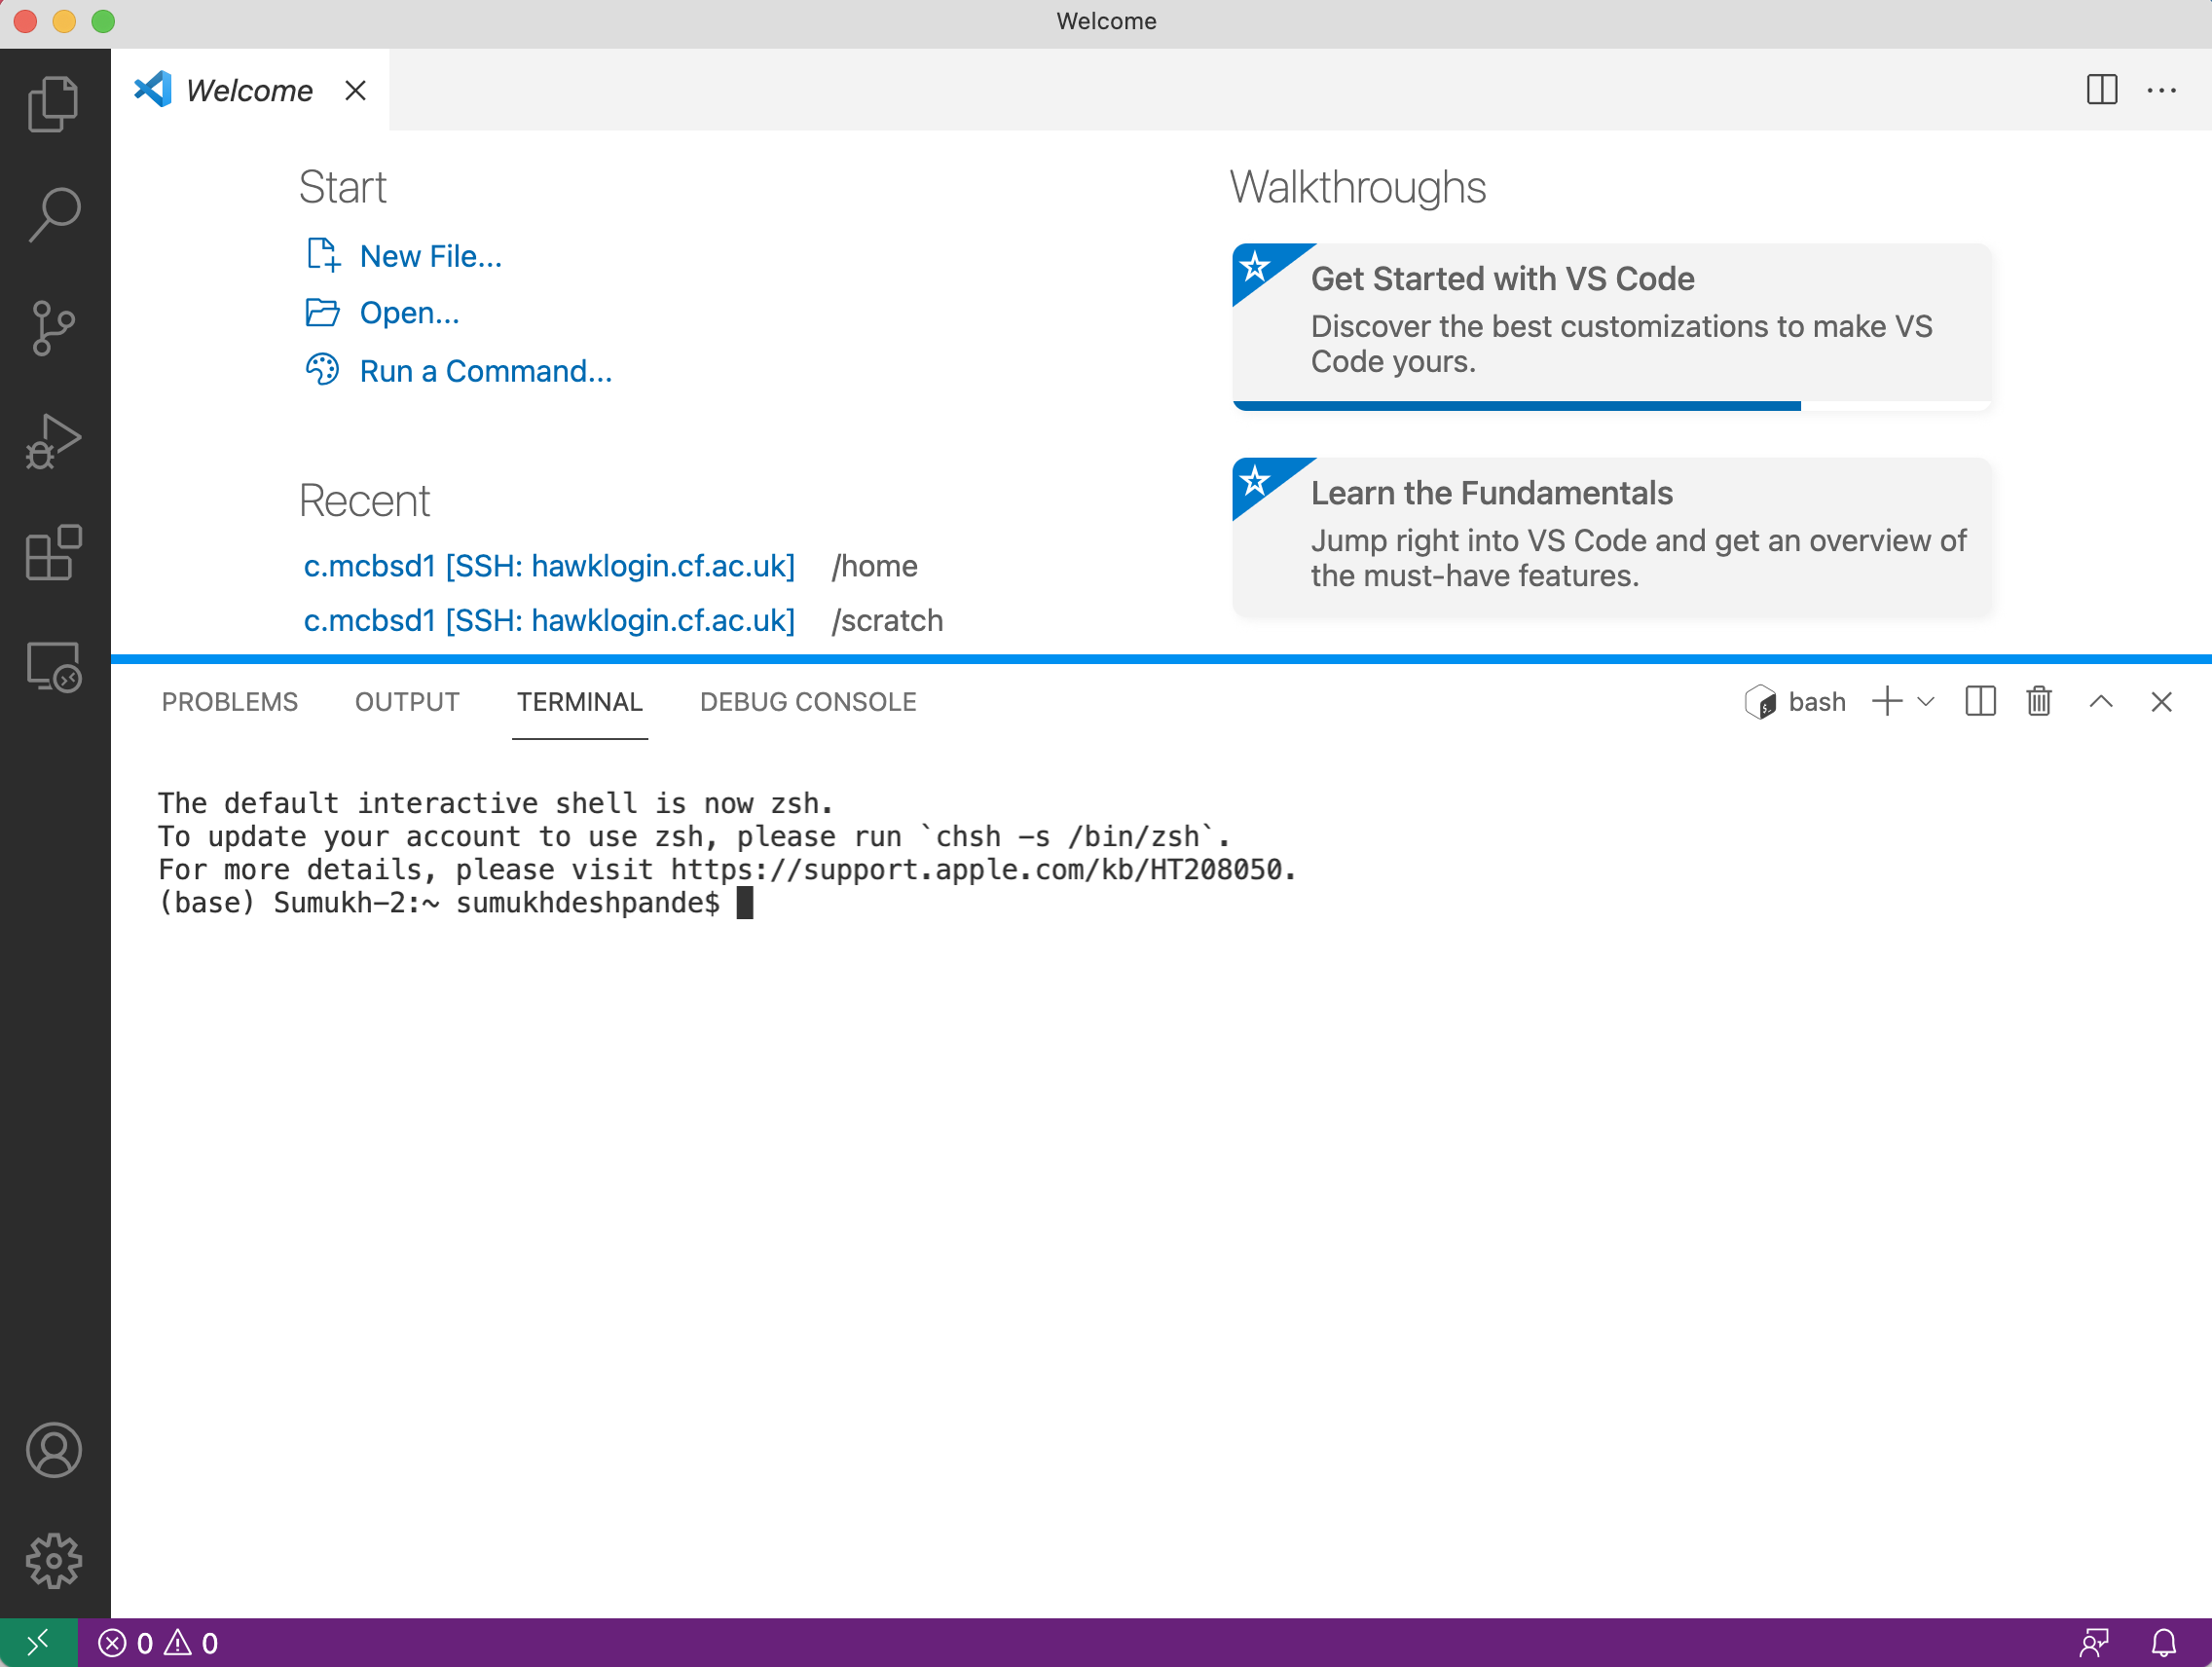
- If you are using VSCode, then follow the steps to access the terminal:
- The VSCode is an Integrated Development Environment (IDE) and is an open-source editor and supports various programming languages and is known for its efficiency in writing, debugging, and maintaining code.
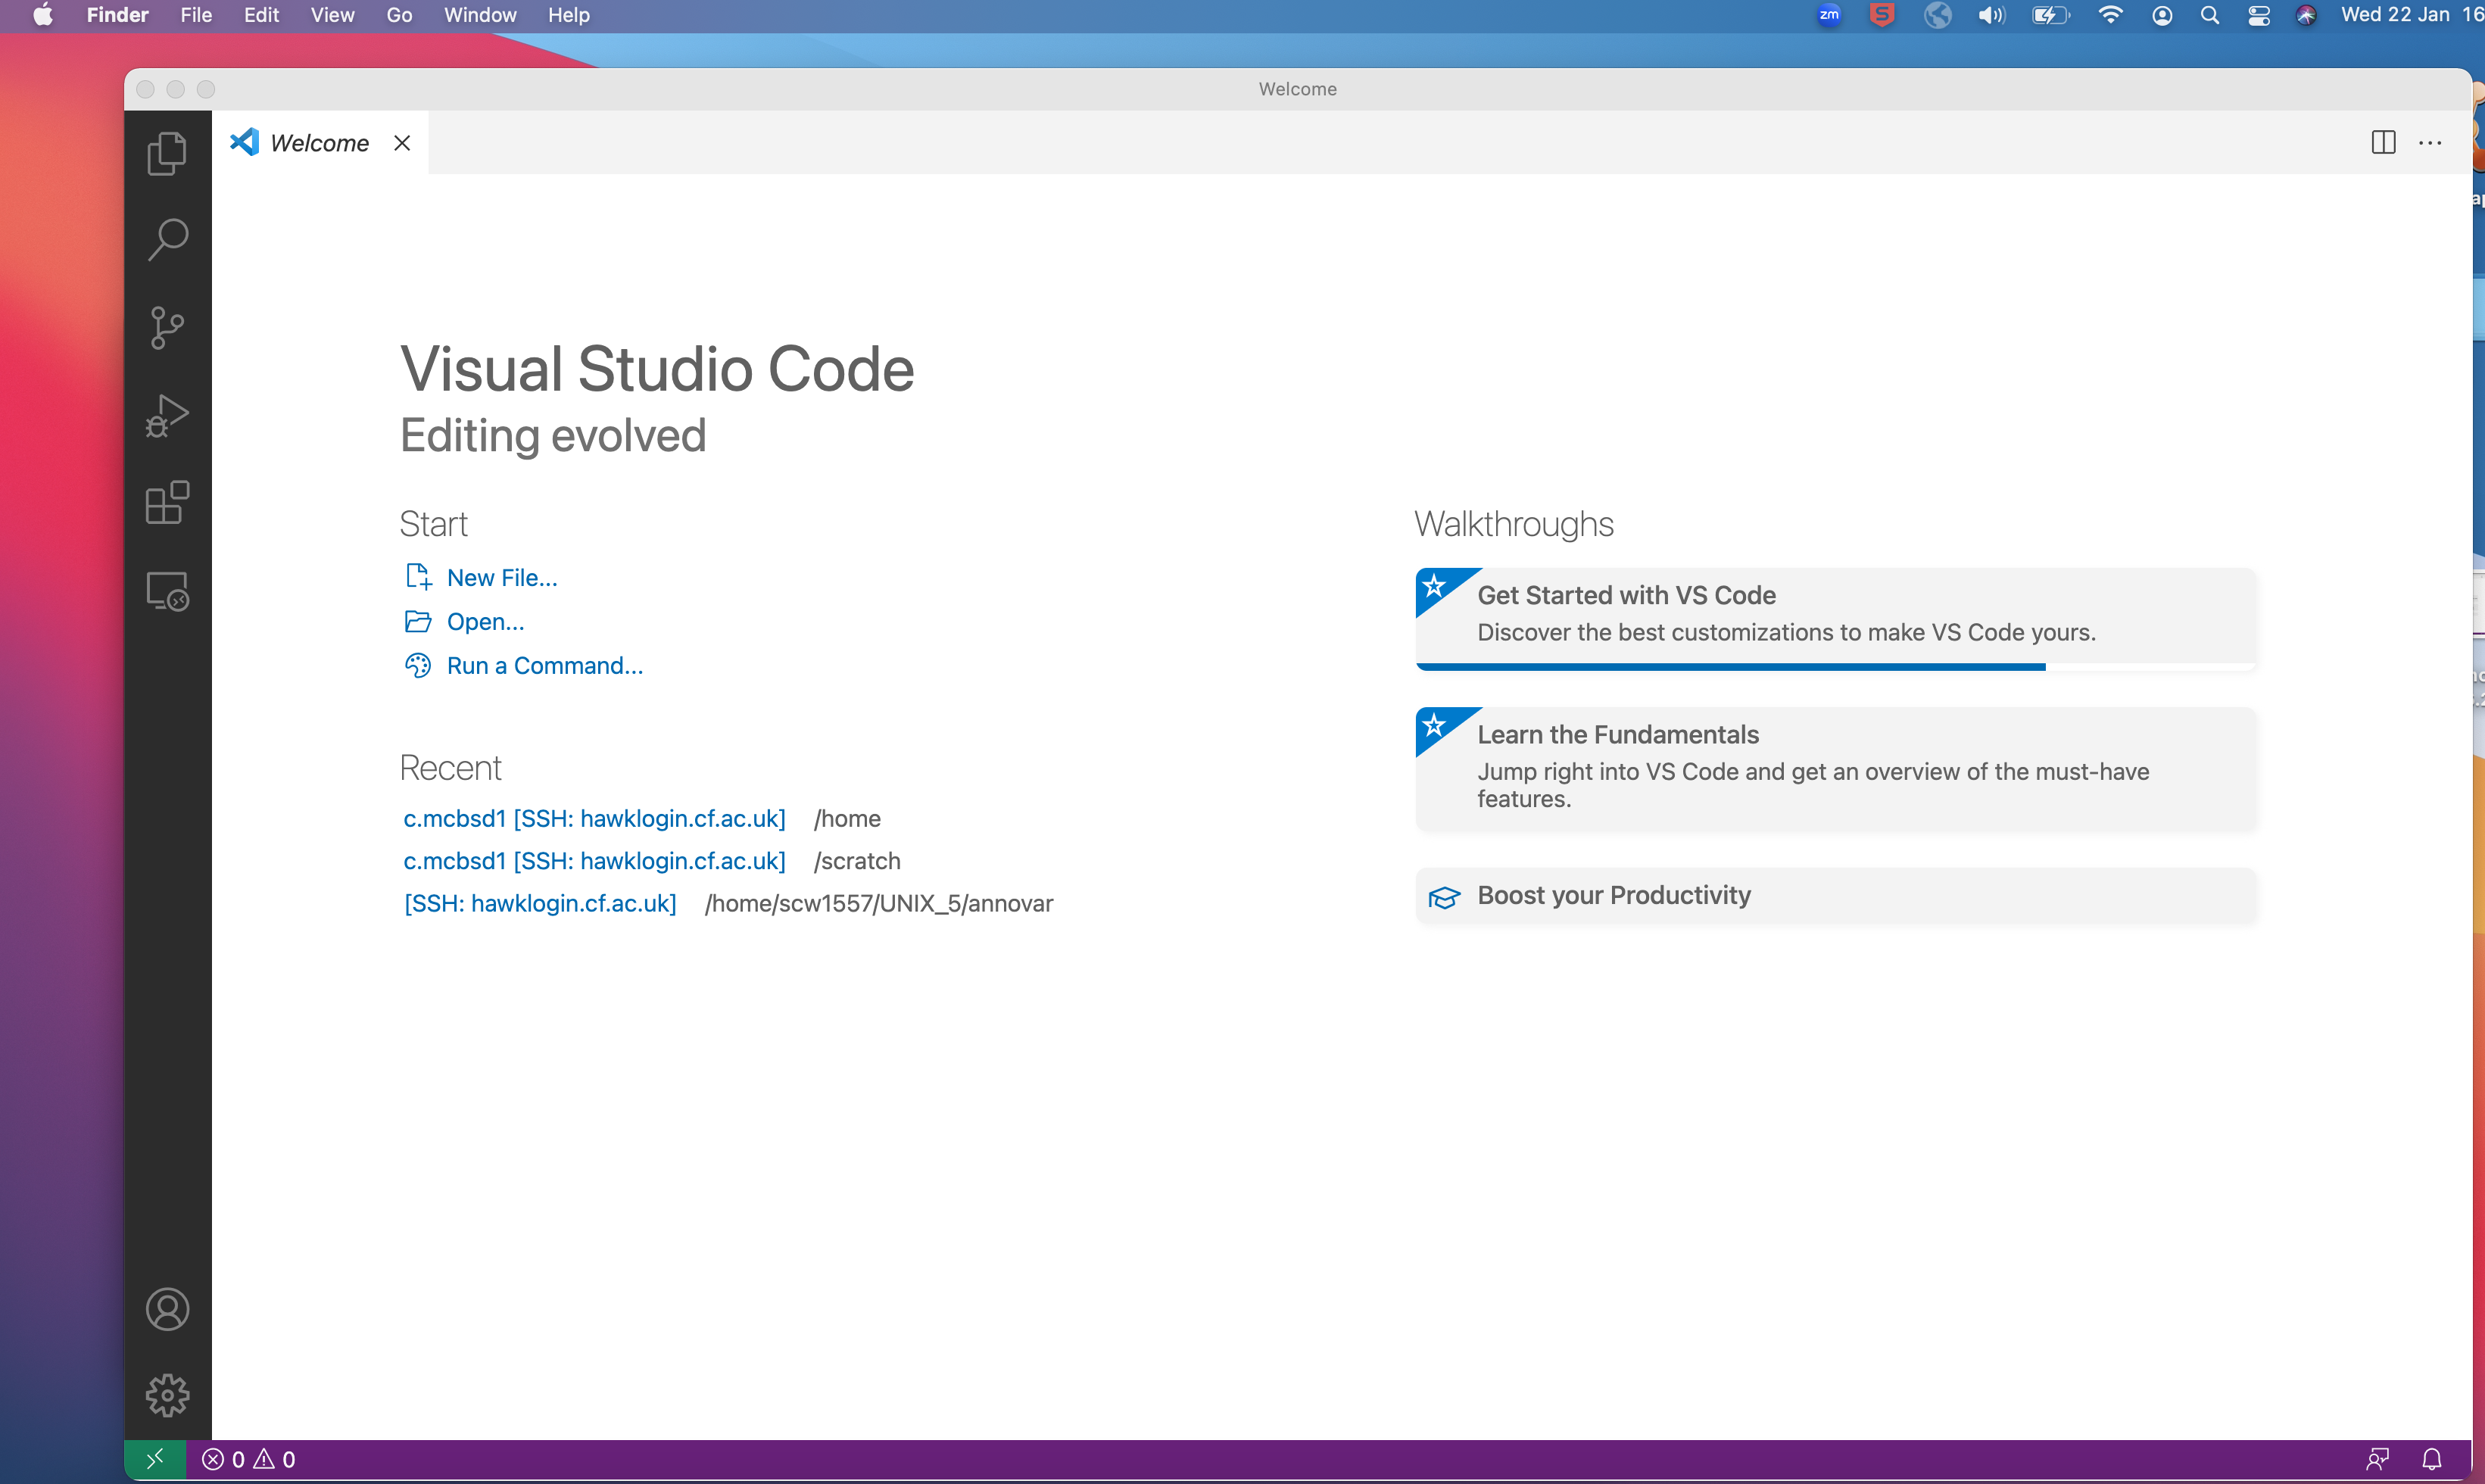
- On the top panel, click on Terminal tab and then click on
New Terminal.
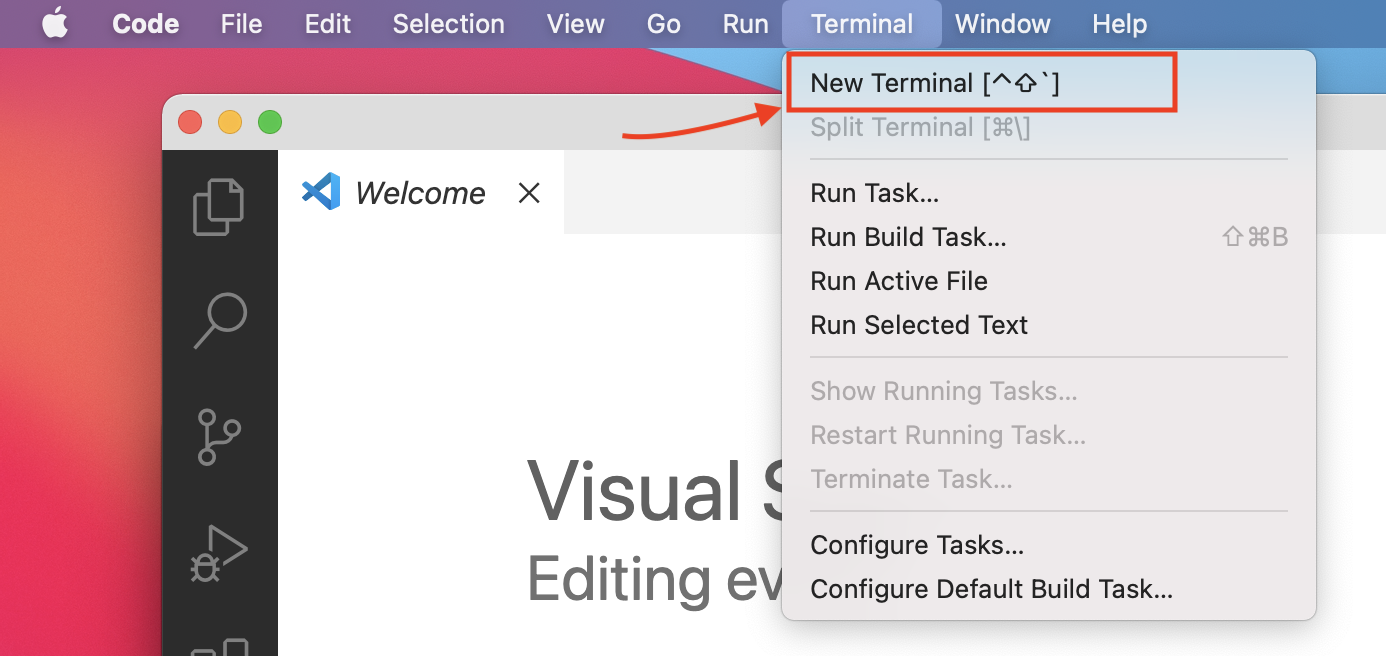
- This will open a terminal window within the editor where you can type in unix commands.
Linux Users
- In your shell, log into HAWK with:
ssh c.c1234567@hawklogin.cf.ac.uk
#Enter Password
Cellranger workflow
- If you are beginning with FASTQ files that have already been demultiplexed, you can skip the demultiplexing step and begin with
cellranger count.
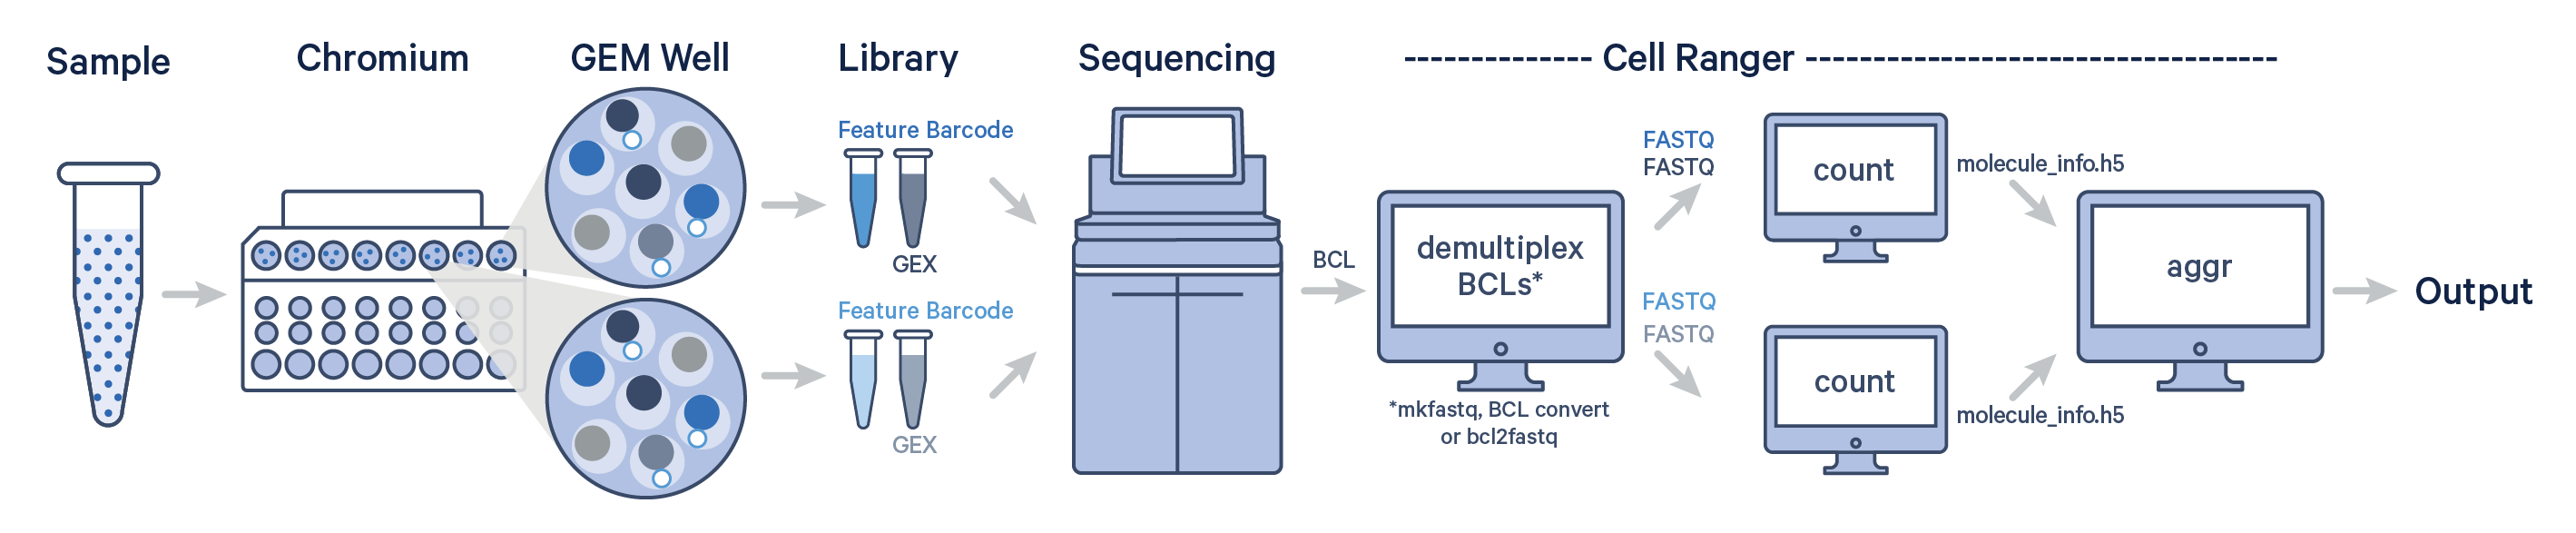
One sample, multiple GEM wells, one flow cell
-
Here, one sample is processed through multiple GEM wells. This is typically done when conducting technical replicate experiments.
-
The libraries from the GEM wells are then pooled onto one flow cell and sequenced.
-
Here, we focus on the Fastq’s generated and
cellranger countis executed. Following this,cellranger aggris executed for aggregating the counts.
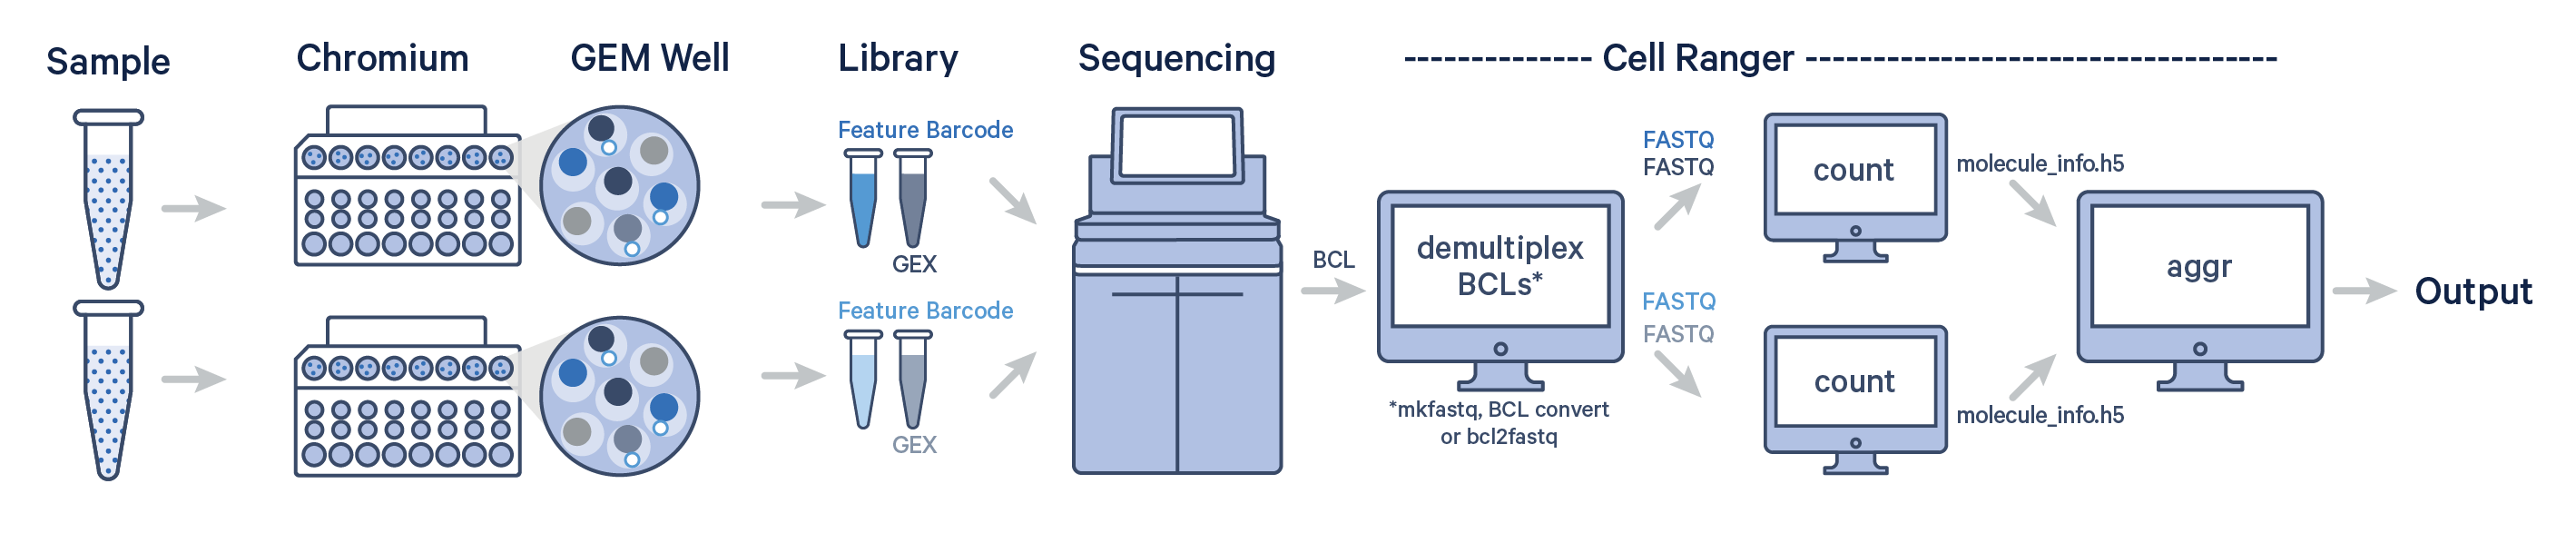
Multiple samples, multiple GEM wells, one flow cell
-
In this example, multiple samples are processed through multiple GEM wells, which generate multiple libraries and are pooled onto one flow cell.
-
After demultiplexing, you must run cellranger count separately for each GEM well; if you have two GEM wells, then run
cellranger counttwice. Then you can aggregate them with a single instance ofcellranger aggr
Fetch the project from GitHub
- To get the project directory from GitHub, we simply just copy and paste one line of code below.
- We will first want to move into our scratch directory.
cd /scratch/c.c1234567
- Create a folder named
scrnaseq-course - Navigate into the
scrnaseq-coursefolder
mkdir scrnaseq-course
cd scrnaseq-course
- Next, we want to fetch the project from GitHub.
- Now we can simply paste the following code into the terminal and hit enter:
git clone https://github.com/mcbsd1/scrnaseq.git
- You will get a notification when things are done.
- To double check if the directory has been downloaded, we can use the
lscommand.
Set-up
- We need to change permissions of the
scrnaseq-coursedirectory so that any daughter files and directories will inherit the same permissions. - You will have to navigate to the parent directory first.
cd /scratch/c.c1234567
- In the terminal window paste the following:
chmod -R 777 scrnaseq-course #777 gives read, write, and execute permissions for everyone

setfacl -d -m u::rwx,g::rwx,o::rwx scrnaseq-course #this code gives same permissions to daughter files and directories that are made.
- We also need to change permissions of the scripts in the bin directory:
cd scrnaseq-course/scrnaseq/bin
chmod +x *.sh
Required files
- Once you have downloaded the Github folder, you can view the contents of the scrnaseq folder.
- Use the
lscommand to view the contents of the folder:
.
└── scrnaseq/
    ├── bin/
    │   └──download-ref-genome.sh
    ├── resources/
    │   ├── samplesheet.csv
    │   ├── Mus_musculus.GRCm39.dna_sm.primary_assembly.fa
    │   └── Mus_musculus.GRCm39.113.gtf
    ├── input/
    │   └── fastq/
    ├── main.nf
    ├── nextflow.config
    ├── run_nextflow.sh
    └── output/
- Note: We will be executing the pipeline from the parent directory (scrnaseq)
Downloading the sequencing data - FASTQ files
- Once you have downloaded the Github folder, the next step is to download/fetch fastq data.
- In this course, we will be downloading the fastq data from 10x Genomics website.
- Here is the link for the example data: 1k Mouse Kidney dataset
- Type the following commands to download the example fastq files within input/fastq folder
cd input/fastq
wget https://cf.10xgenomics.com/samples/cell-exp/7.0.0/1k_mouse_kidney_CNIK_3pv3/1k_mouse_kidney_CNIK_3pv3_fastqs.tar
Once this is finished downloading, uncompress the files using the following command:
tar xvf 1k_mouse_kidney_CNIK_3pv3_fastqs.tar
- This will create a folder called
1k_mouse_kidney_CNIK_3pv3_fastqs - List the files inside the folder using the
lscommand.
ls 1k_mouse_kidney_CNIK_3pv3_fastqs
- Now, move the files from
1k_mouse_kidney_CNIK_3pv3_fastqsfolder intofastqfolder. - For this, we will be using
mvcommand. Since we would like to copy all the fastq files, we will be using*.fastqto select all files ending with .fastq - Following this, we will be deleting the empty folder
1k_mouse_kidney_CNIK_3pv3_fastqswhich does not contain any files now.
mv 1k_mouse_kidney_CNIK_3pv3_fastqs/*.fastq .
rm -r 1k_mouse_kidney_CNIK_3pv3_fastqs
Downloading reference genome files - FASTA and GTF files
- For every dataset we run on Nextflow, we will need reference files: FASTA file and GTF file
- If you are working with human data (fastq files)
- Navigate to the
resourcesfolder. - On linux terminal, execute the following commands:
cd resources
bash ../bin/download-ref-genome.sh
Generating samplesheet
- First, prepare a samplesheet with your input data that looks as follows:
samplesheet.csv:
suppliedID,analysisID,sampleGroup
1k_mouse_kidney_CNIK_3pv3,S1,C57_Bl6
- This is stored under resources/samplesheet.csv
- This contains information such as the identifier i.e suppliedID, analysisID and sampleGroup columns.
- The sampleGroup should contain information such as
normalandtumor, orhealthyanddiseased, etc. - Since this example dataset is extracted from C57/Bl6 adult mouse kidney, the sampleGroup column has the value as
C57_Bl6.
Configuration file
- Once the samplesheet is created, the nextflow configuration file
nextflow.configneeds to be created. - Open the
nextflow.configfile using the following command:
nano nextflow.config
- Replace the
c.xxxxxxin theuserIDparameter to your HAWK user ID as found on MySCW dashboard.
For example,
userID = "c.123456"
- Save the file by pressing
cntr + x - Press
yand press enter
Running the workflow
- Simply run the workflow by typing the following command:
sbatch run_nextflow.nf
Once the job is submitted, you can track the status of the job by typing:
squeue -u c.123456
When the job is finished, it will create results folder within the scrnaseq folder which looks like this.
.
└── scrnaseq/
    ├── bin/
    ├── resources/
    │   ├── index
    │   ├── Mus_musculus.GRCm39.dna_sm.primary_assembly.fa
    │   └── Mus_musculus.GRCm39.113.gtf
    ├── input
    ├── main.nf
    ├── nextflow.config
    ├── run_nextflow.sh
    ├── results
    │   ├── cellranger_count_1k_mouse_kidney_CNIK_3pv3
    │   ├── aggr.csv
    │   └── aggregation
    └── output/